Pretty Sketches Pretty and Easy 3d Letters
There is something magical about drawing a 3D letter on a 2D surface. 3D lettering is a technique to create shadows and dimension in your lettering. It makes a letter, word or even an entire phrase, pop right out of the page—a trick that can be extremely useful when creating commercial designs.
As technology evolved and designers searched for new ways to improve the looks of design, shadow type became an intriguing art form.
Here are a few examples of 3D lettering in action:
Designers and craftsmen used wood, metal and glass to craft unique typefaces … the results 'found a ready sale among newly rich merchants' who wanted to advertise their businesses. Shadows were more than mere graphic tricks; they were also veritable signposts of consumption.
When I started lettering I tried to stay away from experimenting with intricate shadows and effects because I thought it was too complicated to pull off. But guess what? It's not as complicated as it seems. In fact, once you get the hang of it, you probably won't want to stop!
But before you dive into this more advanced aspect of hand lettering, it's a good idea to bone up on the basics:
- This in-depth introduction to hand lettering will walk you through the fundamentals: what lettering actually is, the anatomy of letters, different lettering styles, plus a quick exercise to kick start your creative juices and get you experimenting with expressive lettering.
- When you get comfortable with drawing single letters and words, head over to this advanced lettering guide, which will help you take your lettering game to the next level by building out more complex layouts and using longer phrases.
Once you're no longer intimidated by drawing simple letters, words or phrases, you can jump into the tutorial below and add some mind-blowing dimensions to your lettering!
Different types of shadows and dimensions for 3D lettering
—

When adding shadows and dimensions to letters, there are quite a few routes you can take. Start with something as simple as a drop line. Then turn that line into a clean drop shadow, which you can add some shading to later. For extra depth you can add some inner shadows to your letters or if you're feeling adventurous you can play with some bevels, too.
Sounds fun, right? Let's take a look at each option, starting from the easiest, with quick tips on how to achieve each look. But before we begin, keep this essential rule in mind: when creating shadows it's important to define a light source and stick to it throughout the design to maintain a consistent look.
Drop line
The drop line is probably the simplest and quickest way to give your letters some dimension.
You simply have to trace a line near your main letters. If this is your first time doing this, it will help to duplicate the layer that contains the letters. Drag its opacity down and slightly move it to the side—this tends to be a 45* degree.
On a new layer, trace the edges of the shifted layer, then delete the low opacity one.
Just make sure that when you draw your initial letters you leave enough space between them for the drop line.
Easy peasy!
If you're using pen and paper, try working with tracing paper at first. That way, you can just use the papers as guides, just like you would with the layers.

Drop shadow
Adding shadows works for bold, blocky letters as well as some thinner scripts. Go ahead and experiment with adding shadows and dimensions to more lettering styles.
Start off the same way you did for the drop line: duplicate the layer that contains the letters, send it behind the main one and move it to a 45* angle.
Instead of dragging the opacity down though, this time you want to recolor it.
Staying on the same layer, start connecting the edges of the two layers.

Wasn't so hard, right?
Now that you're more confident, let's spice things up by using different angles for the different words.
This look will make your piece more dynamic.
Similar to the previous technique, duplicate, recolor, drag to a 45* angle and connect the edges.
In the meantime, you can also start experimenting with different shadow sizes.

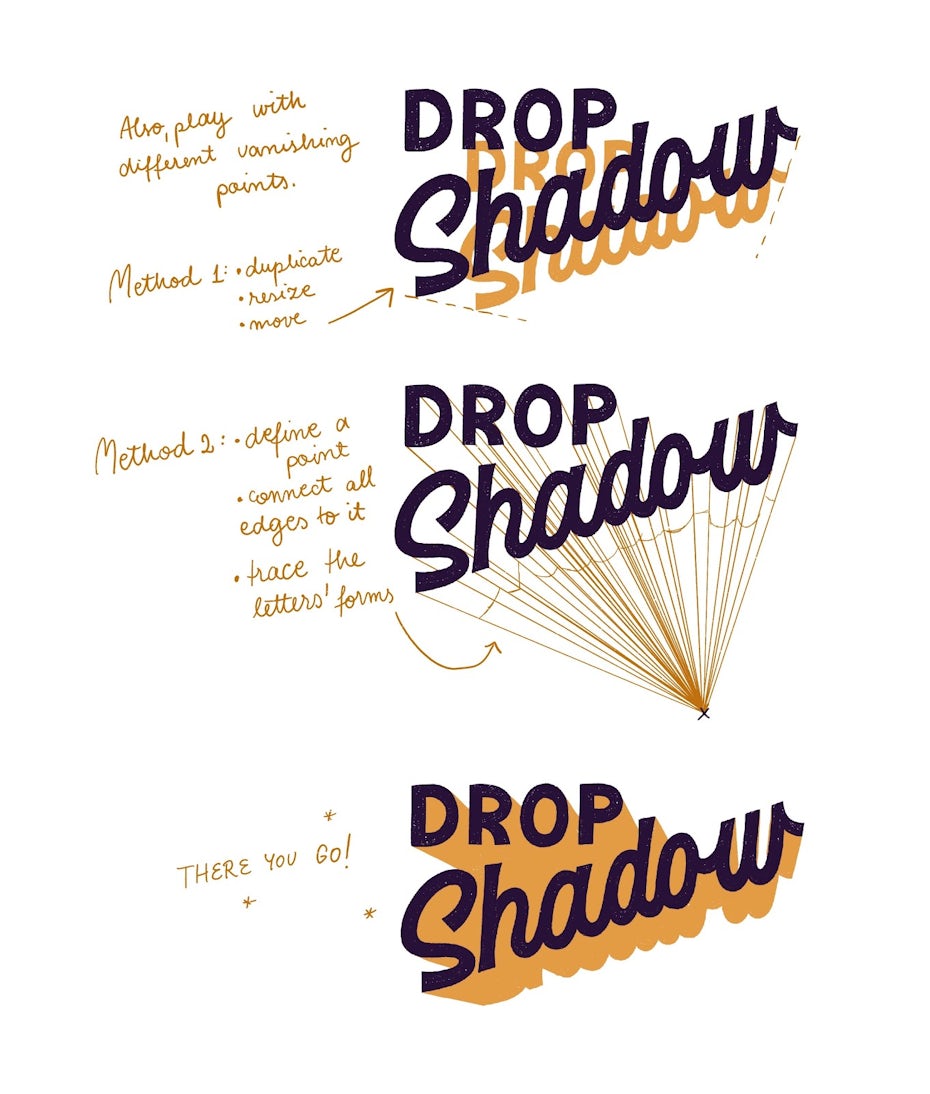
If you're feeling adventurous, you can take it one step further by experimenting with the vanishing point.
You can achieve this look in two ways:
- Duplicate, resize and move the layer, then connect all the corresponding edges; or
- Define a point, connect all edges of the letters to it and trace the letters again on the shadow.
There is no right or wrong way to do this—you simply have to try all options and see what works best for you.
Alright, now that you have mastered adding the drop shadow, go ahead and add some shading to it.
First thing you need to do is define a light source and stick to it. At first you'll get lost a bit but that's okay.
An easy way to figure this out is by imagining that your letter is an actual object on a table. Look at different objects in your room, both rounded and rectangular, to get a feel of how light and shadow play on it.
Once you get the hang of it, you can mix things up and add different light sources to your angled drop shadows. Get creative and weird, don't be afraid to mess things up—you most certainly will, that's how we all learn!.
Just be sure to follow the drop shadow's direction with the shading!

If you want to make your words look even more 3-dimensional, go the extra mile and add a new layer of shadow.
For this you'll need to duplicate your main layer, send it all the way to the back and position it at the base of the drop shadow.
Then, slightly move it to a 45* angle, but this time to the opposite direction to the drop shadow.
Finally, connect the edges of the shadow and drop shadow, paying extra attention to the directions and light sources.

Inner shadow
Here things can get a little complicated, but don't worry. Again, duplicate the main layer, drag its opacity down and move it to a 45* degree. This time, you'll want to leave it on top and draw a new layer between the two.
You only have to color in the areas of the letters that are visible.
For extra depth, you shade parts of the edges. Just remember to follow the light source you defined.

Another cool trick that will help your letters seem even more 3-dimensional is to add an outline. This will give them a "cookie cutter" effect—it will almost look like the letters are empty.
Simply follow the previous technique, but add an outline this time.

Bevel
This technique is probably the one that requires the most patience and practice.
Start by drawing a line in the center of the letter, then connect the tip of the line with the corners of the letter.
Turn the opacity of this frame layer down, and use it as a guide to fill in the letterforms.
Choose three colors: two that are darker than the base of your letter and a lighter one.
Start coloring the same sides with the same color, using the light source you defined.

Mix it up!
You can now start to mix up all these techniques and get to some really interesting 3D lettering results!

You're a 3-dimensional dynamo!
—
If you are reading this sentence, you've powered through this tutorial and you're starting to befriend 3D lettering, which means you are awesome!

With each little doodle you're getting one step closer to mastering the art of dimensional lettering. Don't worry, you'll start seeing the results of your practice sooner than you might expect.
Just remember to start small, with some easy drop lines and as you get comfortable with the different styles, slowly work your way up to more complex dimensions. Take it easy and allow yourself to make mistakes.
Practice makes perfect—nobody manages to do intricate dimensions on the first attempt. Try to have fun with it and enjoy the process!
Want even more lettering inspiration?
Browse creative lettering from professional designers.
Source: https://99designs.com/blog/design-tutorials/3d-lettering/
0 Response to "Pretty Sketches Pretty and Easy 3d Letters"
Post a Comment